Definition of Clipping Path | Clipping Path Service
Unlock the graphic design magic with Clipping Path, a masterful technique that gracefully liberates subjects from their backgrounds in images. Picture a virtual mask, delicately created by outlining the desired object with a closed path. At Aesthetic Eurasia Limited, we stand as maestros of Clipping Path services, delivering excellence at unmatched rates.
Our adept team employs precision to expertly isolate and refine your images, ensuring a polished and seamlessly professional appearance. We go beyond ordinary, committing to both quality and affordability, aiming to elevate your visual content with cost-effective solutions tailored to your individual needs. Trust Aesthetic Eurasia Limited for unparalleled Clipping Path services that breathe life into your visuals without causing a dent in your budget.
In the realm of graphic design, Clipping Paths come to life through specialized software like Adobe Photoshop or Illustrator. Here, anchor points are strategically placed along the object’s outline, crafting a resulting path that can range from a simple shape to a complex curve, mirroring the unique contours of the object in focus. Step into the world of Aesthetic Eurasia Limited, where every image tells a story of precision, finesse, and visual brilliance.
Importance and applications of Clipping Path in various industries:
The clipping path is a fundamental technique in image editing that holds significant importance in various industries. Its versatility and precision make it a valuable tool for professionals in different fields. Here are some of the key industries where clipping path finds extensive applications:
- 1. Advertising and Marketing: The clipping path is widely used to create eye-catching visuals for print and digital campaigns in the advertising and marketing industry. It allows designers to isolate products, remove backgrounds, and place them on attractive backgrounds or composite them into complex scenes. The clipping path ensures that product images appear seamless and appealing, enhancing the overall visual impact of advertisements.
- 2. E-commerce: E-commerce platforms heavily rely on high-quality product images to attract customers. The clipping path enables e-commerce businesses to showcase their products effectively by isolating them from distracting backgrounds. It helps create consistent and professional-looking product catalogs, enhancing the customer’s perception and driving sales.
- 3. Photography and Photo Editing: Professional photographers and photo editors utilize clipping path techniques to refine their images. Whether removing unwanted objects from a photo, isolating the subject for creative compositions, or enhancing specific elements, the clipping path allows photographers to achieve precise and seamless editing results.
- 4. Graphic Design: The clipping path is an indispensable tool for graphic designers. It enables them to create custom-shaped images, isolate specific elements, and integrate them into various design projects. Whether it’s designing brochures, flyers, posters, or website layouts, clipping path helps designers achieve clean and visually appealing compositions.
- 5. Publishing and Printing: The clipping path is crucial in the publishing and printing industry. It allows publishers to extract images from different sources and seamlessly integrate them into layouts. Magazine layouts, book covers, and product packaging designs often rely on clipping paths to achieve professional and visually engaging results.
- 6. Fashion and Apparel: The clipping path presents clothing items on models or mannequins without distractions in the fashion and apparel industry. It helps remove background elements and ensures that the focus remains on the apparel, enabling customers to visualize the product accurately before purchasing.
- 7. Architectural and Interior Design: The clipping path is applied to create visually appealing presentations in architectural and interior design industries. It allows designers to extract furniture, fixtures, or decorative items from photographs and integrate them into design mockups or presentations.
These are just a few examples of industries where clipping path techniques are widely employed. The precision and flexibility of the clipping path make it an invaluable tool for professionals seeking to enhance and manipulate images effectively. The clipping path empowers creative professionals across different industries to achieve visually stunning results by isolating objects, removing backgrounds, and integrating elements seamlessly.
Understanding Clipping Path:
A clipping path, a deep etch or closed vector path, is used in graphic design and image editing to isolate a specific object or subject from its background. It involves creating a closed path or shape around the desired element, effectively separating it from the rest of the image. The area outside the path is then either removed or made transparent, allowing the isolated object to be placed on a different background or integrated seamlessly into other designs.

How to Create a Clipping Path:
- Manual Clipping Path using Photoshop:
-
- A step-by-step guide with screenshots:
- Step 1: Open the image in Adobe Photoshop and select the Pen Tool from the toolbar.
- Step 2: Zoom to the object you want to isolate for better accuracy.
- Step 3: Start creating anchor points along the object’s edge by clicking on the outline. Place the points strategically to follow the curves and contours smoothly.
- Step 4: After placing a series of points, close the path by connecting the last anchor point to the first one.
- Step 5: Fine-tune the path by adjusting the position of anchor points, using the Direct Selection Tool (white arrow) or by converting points to curves with the Convert Point Tool.
- Step 6: Once the path is complete and refined, right-click on the path and choose “Make Selection” from the context menu.
- Step 7: Adjust the selection settings (feather, anti-aliasing, etc.) if needed, and click “OK.”
- Step 8: With the selection active, you can now copy, cut, or apply various image editing techniques to the isolated object.
- A step-by-step guide with screenshots:
- Tips and techniques for accurate results:
-
- Zoom in for precision: Working at a higher zoom level allows for more accurate placement of anchor points, especially around complex or detailed edges.
- Use fewer points for smoother curves: Use as few anchor points as possible while maintaining the desired shape. Too many points can result in jagged edges.
- Utilize different tools: Besides the Pen Tool, experiment with the Convert Point Tool or Add Anchor Point Tool to refine curves and create more precise paths.
- Save paths for future use: Save the clipping path as a Work Path or Path in Photoshop, so you can easily reuse it or make adjustments later without starting from scratch.
- Automated Clipping Path tools:
Overview of popular software and online services:
- Adobe Photoshop’s Magic Wand Tool or Quick Selection Tool: These tools use automated algorithms to select objects based on color or texture similarity. While they can be useful for simple shapes, they may provide a different level of precision than manual clipping paths for complex objects.
- Online Clipping Path Services: Various online platforms and services offer automated clipping path tools. Users upload their images, and the software uses algorithms to detect and remove backgrounds. Examples include Remove.bg, Clipping Magic, and AutoClipping.
- Pros and cons of automated tools:
-
- Pros: Automated clipping path tools can be faster and more efficient for simple images with distinct foreground and background elements. They require less manual effort and are suitable for quick edits or when dealing with many images.
- Cons: Automated tools may not accurately handle complex or detailed edges, transparent or translucent objects, or objects with similar colors to the background. They can result in rough or inaccurate selections, requiring manual refinement.
It’s important to note that while automated tools can be convenient, manual clipping path techniques offer greater precision and control, especially when dealing with challenging images. Depending on the complexity of the object and the desired results, designers can choose the most suitable approach for creating clipping paths.
Benefits of Clipping Path :
- Precise image isolation: One of the primary benefits of using a clipping path is achieving precise and accurate image isolation. By creating a path that follows the object’s contours, designers can effectively separate it from the background. This precision ensures clean edges and eliminates unwanted elements, producing a polished and professional appearance.
- Enhanced image editing capabilities: Clipping path techniques significantly enhance image editing capabilities. Once an object is isolated, designers have greater control over editing and manipulation. They can apply various adjustments, such as color correction, retouching, or applying special effects, exclusively to the isolated object without affecting the background or other elements in the image. This level of control allows for more targeted and precise edits, resulting in high-quality and visually appealing images.
- Versatility in image manipulation: Clipping path offers immense versatility in image manipulation. Once an object is separated from its background, designers can seamlessly integrate it into different settings or composite it with other elements. This versatility allows for creative freedom and offers various possibilities for design projects. Objects isolated using a clipping path can be placed on various backgrounds, combined with other images, or used in collages, advertisements, and product presentations.
- Consistency in design and branding: The clipping path is crucial in maintaining consistency in design and branding efforts. By isolating objects from their original backgrounds, designers can create a unified visual identity across different platforms and media. This consistency is especially important for businesses that require consistent product images, such as e-commerce websites or catalogs. The clipping path ensures product images have a consistent look and feel, reinforcing brand identity and professionalism.
Furthermore, the clipping path allows for easy background replacement or customization, enabling designers to align the visuals with the overall brand aesthetics. It ensures that images used in marketing materials, websites, or social media platforms are cohesive and align with the brand’s visual guidelines.
Advanced Clipping Path Techniques:
- Complex and intricate objects:
- Hair and fur masking:
- Hair and fur present a challenge due to their intricate and fine details. Manual clipping paths may not always achieve satisfactory results.
- Techniques like using advanced selection tools (e.g., Select and Mask in Adobe Photoshop) or specialized plugins can help create precise masks around individual hair strands or fur.
- Layering techniques, such as using multiple masked layers or applying blending modes, can refine the appearance and naturally blend the hair or fur with the background.
- Transparent and translucent objects:
- Transparent or translucent objects, such as glass, bottles, or fabrics, require careful handling to preserve their transparency and maintain a realistic look.
- Instead of a single clipping path, combining clipping paths and alpha channel masking can accurately capture the object’s transparency.
- Techniques like adjusting opacity, using blend modes, or adding layer effects can help achieve the desired level of transparency and enhance the object’s visual appeal.
- Multiple Clipping Paths for detailed editing:
- Creating layers for different image elements:
-
-
- For images with multiple elements that require individual editing, creating separate layers for each element can provide more flexibility and control.
- By applying clipping paths to each layer, designers can isolate specific areas and apply targeted adjustments, such as color correction, retouching, or effects, to each element separately.
- This technique allows for non-destructive editing and the ability to fine-tune each element without affecting others.
-
- Using multiple paths for selective adjustments:
-
- In some cases, a single clipping path may not provide enough control for detailed editing. Using multiple paths allows for selective adjustments to different parts of an object.
- For example, separate paths can be created for the main product, its label, and additional elements in a product image. Each path can be used to apply distinct adjustments or enhancements to those specific areas, ensuring precise and localized edits.
- Multiple paths also enable extracting individual components of a complex object, facilitating composite designs or rearrangements.
Advanced clipping path techniques offer greater precision and control when dealing with complex objects or detailed editing requirements. Whether achieving realistic hair or fur masking, handling transparent or translucent objects, or applying selective adjustments using multiple paths, these techniques empower designers to create more sophisticated and refined visuals.
Best Practices for Clipping Path:
- Choosing the right Clipping Path technique for different scenarios:
- Assess the complexity of the object: Consider the object’s edges, transparency, and intricate details. Choose the appropriate clipping path technique based on the object’s characteristics, such as basic, compound, complex, or alpha channel masking.
- Evaluate time and accuracy requirements: Manual clipping path techniques may yield more precise results for highly detailed or challenging objects. Automated tools can be efficient for simpler objects but may require manual refinement.
- Adapt to the specific project: Consider the final usage of the image and the level of detail required. Different projects may demand different clipping path techniques to achieve the desired outcome.
- Maintaining image quality during the process:
- Work with high-resolution images: Starting with high-quality images ensures better accuracy and preserves image details during the clipping path process.
- Use non-destructive editing techniques: Instead of applying edits directly to the original image, work on separate layers or make use of adjustment layers. This allows for easy modifications and preserves the original image data.
- Avoid excessive feathering or blurring: While feathering can help blend the edges of the clipped object, excessive feathering or blurring can result in loss of detail and a less natural appearance. Use feathering sparingly and adjust it based on the image’s requirements.
- Tips for efficient and time-saving Clipping Path workflow:
- Master the Pen Tool: Practice using it and familiarize yourself with its shortcuts and functionality. This will improve your efficiency and precision when creating clipping paths.
- Utilize keyboard shortcuts: Keyboard shortcuts can speed up your workflow. Learn the essential shortcuts for tools like the Pen Tool, Zoom, and switching between anchor point types.
- Save and reuse paths: Save your completed clipping paths in Photoshop as paths or work paths. This allows for easy retrieval and reuse of paths in future projects, saving time and effort.
- Use adjustment layers and smart objects: Instead of making direct edits to the clipped object, utilize adjustment layers or convert the object into a smart object. This way, you can make non-destructive adjustments and easily modify them later.
By following these best practices, designers can achieve accurate clipping paths, maintain image quality, and optimize their workflow for efficient and effective results. Clipping path techniques become more refined and efficient with practice, allowing designers to deliver high-quality images and save time in their image editing projects.
Common Challenges and Troubleshooting:
Dealing with challenging image backgrounds:
- Busy or complex backgrounds can make creating a clean and accurate clipping path difficult. Consider using selection tools like the Quick Selection Tool, Magic Wand Tool, or the Select and Mask feature in Photoshop to make an initial selection.
- Refine the selection using techniques like the Refine Edge or Select and Mask to accurately adjust the edge detection, smoothness, feathering, and contrast to separate the object from the background.
- Utilize techniques like layer masking or manual touch-up with brushes to clean up any remaining background artifacts or fringing around the object edges.
- Resolving issues with complex object edges:
- Objects with intricate or complex edges, such as irregular shapes, transparent elements, or fine details, require extra attention during the clipping path process.
- For complex edges like hair or fur, consider using specialized tools like the Refine Edge or Select and Mask in Photoshop. These tools offer options to refine the edge detection and handle fine details more accurately.
- Utilize techniques like creating multiple paths, alpha channel masking, or layer blending modes to maintain the object’s natural appearance and blend it seamlessly with the desired background.
- Addressing color bleeding and halo effects:
- Color bleeding occurs when the color from the background reflects onto the edges of the clipped object, resulting in an unnatural appearance. To address this issue:
- Use the Clone Stamp or Healing Brush tool to remove any color bleed or unwanted reflections from the object’s edges.
- Create a layer mask and manually touch up the edges using soft brushes or a low-opacity brush to blend the edges with the background.
- Halo effects are unwanted light or dark outlines around the edges of the clipped object. To overcome this issue:
- Refine the edge selection using techniques like Select and Mask, and adjust the contrast, feathering, or smoothing settings to reduce halo effects.
- Create a layer mask and use the Brush tool with a soft brush to manually paint the affected areas, blending the edges with the background.
It’s important to remember that challenging images may require a combination of different techniques and tools and manual touch-ups to achieve the desired results. Regular practice and experimentation with various troubleshooting techniques will help overcome common challenges and achieve clean and precise clipping paths.


How does Clipping Path work?
Creating a clipping path typically involves using specialized software like Adobe Photoshop or Illustrator. The designer manually traces the object’s outline using the Pen Tool or the Curvature Pen Tool. The designer creates a path that conforms precisely to the element’s shape by placing anchor points along the object’s edges. Depending on the object’s contours, the path can be either a simple shape or a complex curve.
Once the path is defined, the designer can separate the object from its background. This can be achieved by deleting the area outside the path or making it transparent. The isolated object can then be placed on a new background or used in various design compositions. Clipping path techniques allow for precise and accurate selection, ensuring clean and polished results.
Types of Clipping Path Techniques: Different types of clipping path techniques can be applied based on the complexity of the object and the desired level of detail. Here are some commonly used techniques:
- Basic Clipping Path: This technique is used for objects with simple or straight edges. It involves creating a path along the object’s outline, separating it from the background.
- Compound Clipping Path: A compound clipping path is used when an object contains multiple elements or has complex shapes. It involves creating separate ways for different parts of the object, allowing for precise isolation and editing of each element individually.
- Complex Clipping Path: Complex clipping path is used for objects with intricate or detailed edges, such as hair, fur, or transparent elements. It requires meticulous path creation, considering fine details, and maintaining natural appearances.
- Multiple Clipping Paths: Multiple clipping paths involve creating multiple ways to isolate different objects or elements within an image. This technique is often used for product catalogs or image editing tasks requiring selective adjustments on different image parts.
- Alpha Channel Masking: Alpha channel masking is a technique where the transparency information of an image is used to create a clipping path. This technique is commonly used for objects with complex or soft edges, like smoke, hair, or fur.
By understanding the different types of clipping path techniques, designers can choose the most appropriate method based on the complexity of the object and the desired editing outcome. Each technique allows for precise control over the isolation and manipulation of objects, ensuring high-quality results in image editing and design projects.
Clipping Path is a graphic design technique that isolates objects or subjects from their backgrounds in images. It involves creating a closed path or shape around the desired object, allowing for precise separation. Clipping Path offers benefits such as precise image isolation, enhanced editing capabilities, versatility in manipulation, and consistency in design and branding. Manual Clipping Path techniques in software like Photoshop allow for accurate results, while automated tools can provide efficiency for simpler objects. Advanced techniques include handling complex objects, using multiple paths for detailed editing, and addressing challenges like intricate edges, transparent objects, color bleeding, and halo effects. Best practices include choosing the right technique, maintaining image quality, and adopting efficient workflow strategies.
Clipping Path is essential in professional image editing for various industries. It enables designers to isolate objects precisely, enhancing their ability to edit, manipulate, and integrate them into different designs. With Clipping Path, businesses can present products attractively in advertisements and e-commerce platforms. It aids photographers in refining images and achieving desired effects. Graphic designers can create visually appealing compositions, while publishers and printers can maintain consistency in design and branding. Clipping Path empowers professionals to achieve polished and captivating visuals in their work.
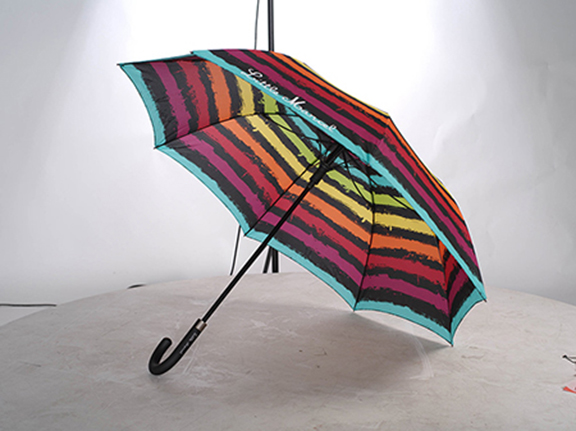
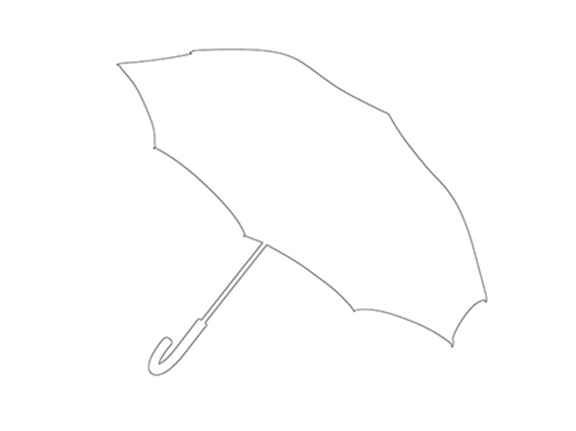
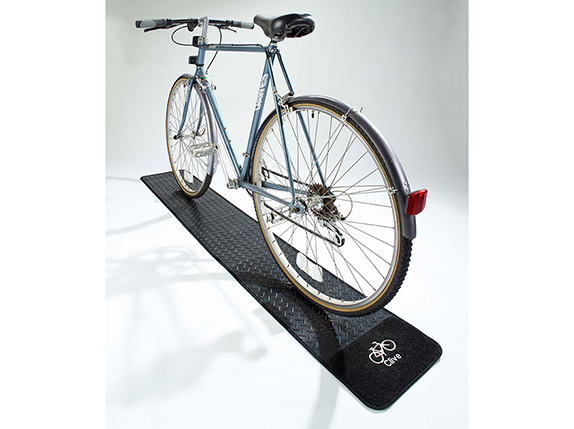
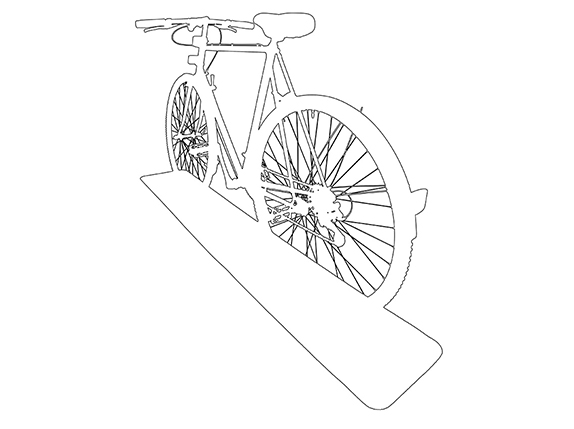
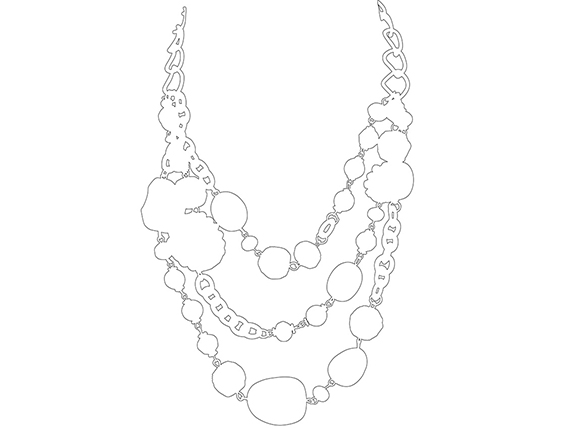
Sample images of Clipping Path
Here are some sample of Simple and complex Clipping Path images

Our Unique Features That Matters
The features we are offering that make us different and unique from our competitors are developed from the things that matter to our clients.

Around The Clock Processing
Our production team works on a roster basis. So you get non-stop image post-processing production.

Efficient Time Management
Meeting the deadline isn’t any unique thing to offer but practicing it continuously by maintaining the quality which we provide matters in the long run.

Fastest Response Time
We ensure the fastest response time and offer special arrangements in case of emergency projects.

Free Trial Up to 5 Image
We don’t want you to fall for any false promises so edit up to 5 images for free and judge our quality and pricing.